Thursday, November 5, 2009

Cheese Glorious Cheese!

I am sure I could live without cheese, but I love cheese! The powdered stuff is not a good enough substitute for the creamy, gooey, yummy real thing. Cheese is in almost all of my everyday recipes. I knew there had to be a way to store cheese safely. I found a few methods in my research. None seemed to be the solution to me until I found Cheese Wax. I was soooo excited.

Cheese wax provided me with a safe way to include cheese into my food storage. Cheese can be stored as long as mold is prevented from growing on it. It does not need to be refrigerated once it is coated in Cheese Wax.

Cheese wax is reusable. After you peel it off your cheese, wash it, dry it and save it for next time. I bought mine from www.cheesemaking.com. I bought three different colors: red, yellow and black. I plan to color code the cheese. I also bought a cheese wax brush, so that I can paint it on if necessary. (Cheese supposedly gets slippery when you try to wax it.) You will also need a double boiler. I recommend an old one or a garage sale find, as you will not be able to use it for any other purpose after using it to melt the wax. Follow the instructions and be careful. Cheese wax is EXPLOSIVE! It will be worth it. Just think about the yummy things you can eat that are made with cheese, glorious cheese.

Beef, It What's for Dinner

I finally used my Mother's Day gift, a pressure cooker/canner. To tell you the truth, I was scared. I have heard horror stories about them blowing up and burning people. I did not have any such disastrous things happen.


I was quite impressed with myself. I read the instruction manual and The Ball Blue Book.
I purchased two of the biggest packages of ground beef (97/3) that I could find. I was hoping to make 7 jars of meat, I only got six. They were a little too full, but I did it anyway. (It is not recommended to overfill your jars.) It took a long time. I used the hot pack method. I started late and did not have all the things I needed. I sent my hubby out to get the things I needed. It took him what seemed like forever. I needed something to warm my jars, so they wouldn't crack when I put the hot meat in them & a ladle to spoon hot water over the meat in the jars.
I chose the hot pack method because I have seen jars of red meat in other peoples storage. It just looks gross to me. I would rather see it browned. Anyway, here is my advice: make sure you have all the things you will need before you start, make sure you know how long it will take, and follow the proven directions.
I have not tried my meat yet, but I am excited. My food storage dinners will have much more variety. We will have sloppy joes, enchiladas, and many more.
Did I mention the house smelled great all night and the next morning?

Sunday, August 16, 2009

Laughing Brownies

I found another recipe for beans. I really like beans. I like brownies too. Put them together and you get a lower fat brownie with added fiber and protein. I had to try it.

You need three things to make Laughing Brownies.
1. A brownie mix
2. A can of black beans
3. Water

Open the brownie mix and dump it in a bowl. I know you know that but I am trying to be thorough.Rinse, Rinse, Rinse the beans. The better they are rinsed the less likely you and your family are to experience the joys of the musical fruit. Put the rinsed, drained beans in a blender. Add one cup of water. (The recipe I found said to put the beans back in the can, then add water to the beans to fill the can. I did that, then I dumped the water off and measured it. It was just about one cup. It was annoying to me to put them back in the can. If you do decide to put them back in the can, rinse your can or you will have musical brownies.)
Puree the beans and water. It smells beany, but your brownies will not when they are done.
Add the bean puree to the dry brownie mix. Mix. The beans will almost disappear if you pureed them well enough. The brownie batter will look about the same as if you follow the recipe on the back of the box. It tastes yummy too. Go ahead and lick the spoon.
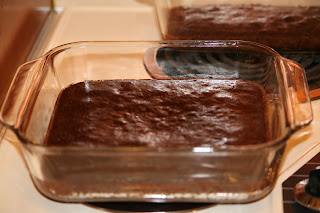
I baked my brownies according to the recommendations on the back of the box. I separated mine into two different pans because my big pan was dirty. I used it the night before and it was full of leftovers.I decided that I like real brownies better. I could get used to these though. Maybe I'll get on a health kick and love them. I was disappointed with the texture of the Black Bean Brownie. It tasted like a microwave cake. My husband agreed the real thing is better, although he did eat several. My daughter did not seem to notice. She would have eaten the whole pan. I rinsed my beans well, so we did not notice any extra gas. I would eat the batter over the actual brownies.
Why do I call them Laughing Brownies? My daughter tried to say Black Bean Brownies and out came Laughing Brownies. I thought the name was funny. Make some, you might be surprised.

White Wheat Bread

I have been wondering about the difference between Hard Red Wheat and Hard White Wheat. I read a little about it online. In my reading I found that white wheat has a milder flavor, but all the same nutrients of red wheat. The length of storage is the same. The difference is in the coloring of the bran. White wheat has a lighter color. I decided that I wanted to try it out. So, I bought some.

I used the same bread recipe. It is hard to tell the difference between red wheat flour and white wheat flour. The loaves of bread made from the white wheat are a lighter color after baking. Not as light as white bread made from white flour.

My conclusion: I will still use a little white wheat. I will use it for tortillas and pizza dough and cinnamon rolls. We learned that our family actually prefers the "wheat" taste in our bread.

My suggestion is if you want to have white bread with higher nutritional content use a mixture of white wheat flour and white flour (bleached flour from the store). I think it would be hard to tell if you sneaked in a cup or two into your loaves. Gradually you could build up the amount of white wheat flour and then mix in the red wheat flour.

If you are considering purchasing wheat and want to get a great price, check out http://www.ldscatalog.com/. They have Hard Red Wheat. There prices are great and shipping is free in the US. Another great thing is there is no minimum weight required for shipment. I think you have to purchase one case of six #10 cans. The current price is just over $22.

Monday, August 10, 2009

Free on Fridays

Most Fridays the Shelf Reliance blog has a give away contest. The winners get great prizes from food storage rotation shelves to food storage foods. Who wouldn't want to win something like that. Check it out for yourself. It is easy to enter. Just go to the Shelf Reliance Blog and follow the instructions. You might be the winner. Then again maybe it will be me. Good luck! Go to www.shelfreliance.com/blog/ to enter.

Saturday, July 25, 2009

Radio

I added an emergency radio to our 72 hour kits. I chose this one because it is small and lightweight. It also is self-powered and has AM/FM and weatherband radio. It is a flashlight too. I hope I never need to use it, but just in case it will be there.

Recipes

I was convinced that food storage was not the most tasty food in the world. I thought "Why store all that stuff? I will have to be starving before I eat it." I found a website with great tips and recipes: www.everydayfoodstorage.net. Crystal Godfrey really knows how to use her food storage and she made me believe that I could do it too. I tried out a couple of her recipes and did not tell my family that is was food storage before they ate it. (That's what she suggests.) They would have never guessed. After I tried a couple of her free recipes that are on her website, I bought her book. I was really sad that I didn't live in Utah. She is having book signings all over Utah. I wanted mine signed too. I think is it so cool to have books signed by the author. I ordered mine from www.amazon.com. When my book arrived, it was signed! How cool! I was so excited. I can't wait to try out more of her recipes.

Binder


This is my Food Storage Made Easy Binder. I bought it from www.foodstoragemadeeasy.net. I love it. It cost $17. It has tips about getting organized, steps to follow to get your food storage, 72 hour emergency preparedness, etc. After you buy the book you are sent an email with a link that allows you to download and print the book at home. It comes with step by step instructions on how to put the book together and a list of what you will need to do it.
If you do not want to spend $17 on the book, most of what is in the book and some things that are not in the book are available free on the website. The "babysteps" are easy to follow. If you follow the plan, you will have 72 hour emergency/disaster kits, a 3 month supply of foods you regularly eat and a one year long-term food storage within a year.
I refer back to my binder often. It is worth it to me to have the binder. It is just easier for me to find it in the book than it is to search the website. If you have a group of people that are interested in buying the book they give discounts for multiple printings.
I love my book. It was definitely worth the $17.

Bread

I made my bread. It was yummy. My kids couldn't even wait for it to cool before they had a slice.

My loaves were two different sizes for two reasons. One was that I didn't divide the dough equally between the two pans. The second was one of my loaf pans is bigger than the other. The loaf pan in the picture was my grandmother's. My mom told me it makes a great loaf of bread. She was right.

I made my bread by hand without a mixer and from wheat that I ground myself. Just in case anyone is wondering, my wheat grinder did a great job. It is very loud. As the hopper empties the grinder spit a few wheat berries out on to the counter. I recommend getting a new silicon-type pastry brush for cleaning out the grinder after each use. I used an older boars hair one and had bristles in my wheat flour. I borrowed a wheat grinder similar to mine a couple of years ago. I used a wet wash cloth to clean it. I do not recommend that method. It made the wheat flour stick in all the tiny corners. Not fun.

The recipe I used was great. I found it at http://www.safelygatheredin.blogspot.com/. It is a great recipe. The post about it has pictures and easy to follow step by step instructions with pictures. I used honey not sugar. I used a little more flour than the recipe called for because as I kneeded the dough it became too sticky.

Yummy.

Friday, July 17, 2009

Bread Calculation

I did a little calculating and thought I would share what I came up with.

I wanted to know what I would need to make bread for one year for my long term food storage.
I decided I want to make bread twice a week every week. That makes 52 X 2. I will make bread 104 times a year.

The last time I made bread, Thursday, it took about 7-8 cups of wheat flour. In order to get 7-8 cups of wheat flour I ground about 1/2 of a #10 size can of hard red winter wheat. I will need about 52 #10 cans of wheat.

My recipe calls for six ingredients: water, yeast, honey, oil, salt and wheat flour. Water comes out of the tap. I plan to purchase yeast at Wal-mart. My recipe calls for 1tbsp. I use Fleischmans in a jar. Each jar contains about 16 tbsp. (104/16=6.5 jars) 7 jars X $4.00/jar=$28.00. Honey must be a popular gift. I have received it many times. No need to buy honey right now. I am all stocked up on oil. My recipe only calls for 3 tbsp of oil. I have a large supply of salt. (I received it as a wedding gift 15 years ago.) The last time I made bread it took about 7-8 cups of wheat flour. In order to get 7-8 cups of flour I ground about 1/2 of a #10 size can of hard red winter wheat. I will need 52 #10 cans of wheat.

For now I will need to spend about $28.00 on yeast and purchase wheat, then I will be making bread like a mad woman.

Monday, July 13, 2009

Wheat

This blog entry isn't really about wheat, it is about my husband's wheat grinder. It was a gift. He got it for Father's Day! He will never use it. It is really for me!!! What a great way to get the things I need. I learned the trick from Brother Leckie. He gave his wife a tiller one year for Mother's Day (maybe it was for her birthday).

I researched wheat grinders online before purchasing. I weighed the pros and cons, then purchased this one. It is a Blendtec/K-Tec.

Pros: lightweight, small, grinds many grains and beans, makes fine flours, internal parts do not need to be cleaned, I have used a similar one before, less expensive than many other grinders

Cons: loud, cannot make cracked wheat

Paying less is always great as long as I am sure it is a quality product. I did not find any reviews with quality concerns. The only thing I was worried about was the noise. I will not be using it that often so it should not be a huge problem. Several of the reviews suggested a solution to the noise. The reviews suggested using it in the garage or outside. As for the cracked wheat, I do not eat it. If it becomes necessary for me to eat cracked wheat, a blender can perform that task.


My plan is to try it out tomorrow. I am excited. I make killer wheat bread and don't get me started on wheat crust pizza!

Wednesday, June 17, 2009

3 Month Start

I am working on a Three Month Supply of food and Essentials. Originally what I was doing to build up our 3 month supply was putting anything that was left in the cabinets at the end of the week in the basement. I had mostly a disorganized mix of foods. They were also the foods that we chose not to eat when they were upstairs. This built up a little quantity, but it was our last choice foods. I decided that these were not the best things to store. If under stress, we will want to eat some of our favorite foods.

I started to buy extra of what we eat the most. Great idea right? Kind of. After a little while I had some of the ingredients for some of our favorite meals. Not really all that helpful either.

In the past I focused mainly on dinners. We eat breakfast and lunch too! I have tried to accumulate breakfast foods lately. My easy shelf stable breakfasts are cereal and fruit bars. My kids love pancakes and sausage. My goal is to learn how to store this stuff. I have the Ball Canning Guide and it says that sausage patties can be canned. Someday I will try it.

Our lunch menu is coming along. I have planned for chicken salad sandwiches, pb&j and pasta. I need to learn how to make bread and what I need to store for it. The Safely Gathered In blog has a recipe I plan to try.

I need to make a plan for dinners. Something is better than nothing. I do have something.

Tuesday, June 16, 2009

Win a Food Storage Organizer

You could win a food storage organizer. I have seen them at Time Out for Women. They look like a really great way to rotate cans in your food storage. The shelf reliance blog is giving away one of the 72" Food storage organizers. I entered to win. You can too. Just visit their blog and enter. www.shelfreliance.com/blog/ Good luck. I hope I win. If not, I hope you win.

Wednesday, June 10, 2009

There Are Beans in the Cake

Several places on the internet suggested using beans in baked items as a way to rotate food storage. I was not sure it would work. I had to try it for myself. I have dry beans in my food storage but I do not use them. I do not know how to rehydrate them. After I try it I will show you how. I am sure it is not hard, but I have never done it.

The beans are used as a substitute for cooking oil. This cake mix called for 1/3 cup of oil. I chose to use white beans because it was a light colored cake. Chocolate cake or brownies would be great for black beans I've read.
Here's how you do it. Put the rinsed re hydrated or canned beans in the blender. Puree them. My blender required a little bit of water along with the beans. About a tablespoon.

This is what they looked like when I was done.


Below is a picture of my baked cake. It looks about the same. It does not have a beany smell, although the entire kitchen smelled like beans from the prep work.
Here is the finished cake frosting and all on a plate, so you can see the inside. Could I taste the beans? NO. Did my family know? NO. I made a yellow cake because I had it already. I do not like yellow cake. My son has issues with chocolate. I am not that familiar with yellow cake, but it seemed to me that it had a little more dense of a texture than one made with oil.
Will I do it again? Probably, but not frequently. It only used 1/3 cup of re hydrated beans. Very little rotation involved in this recipe. I did not save my pureed beans for future use. I will just make more.

72 Hour Kits

Last year we made two 72 hour kits. I was pretty impressed with our efforts at the time. As I went through the contents more recently I decided they were probably lacking a few necessary items. They are better than nothing.

I put a lot of thought into the container/holder for our kits. I finally decided on rolling backpacks. They have more than one method of transporting them. They can be worn like a backpack, pulled behind by the handle and wheels, or they can be carried by the handles on the top and bottom of the bag. I researched them before I bought them. There are tons of them on the internet. They are quite expensive. The good ones ranged from $65 to $120. I thought I would take a look at what Walmart had to offer before making my purchase. Our backpacks were $17.95! What a bargain. They have sturdy construction and good wheels. The backpack itself should survive 72 hours. The blue one is for the girls and the orange one is for the boys. I think I will change that because when I took them down I was certain that the boys should have blue.

When I emptied the backpacks I remembered I had no water. I had contact solution, but no contact case or glasses. A waterproof match holder but no matches. They definitely could use some improvement.
Later I will make a list of the contents to my revised 72 hour kits.

Wednesday, June 3, 2009

My Purpose

Recently I have been obsessed with food storage. It is my goal to learn how to obtain a usable one year supply of food and other essentials for myself and my family. To help me with my goal I have decided to start a blog to mark my progress. I hope that this will help me reach my goal.